
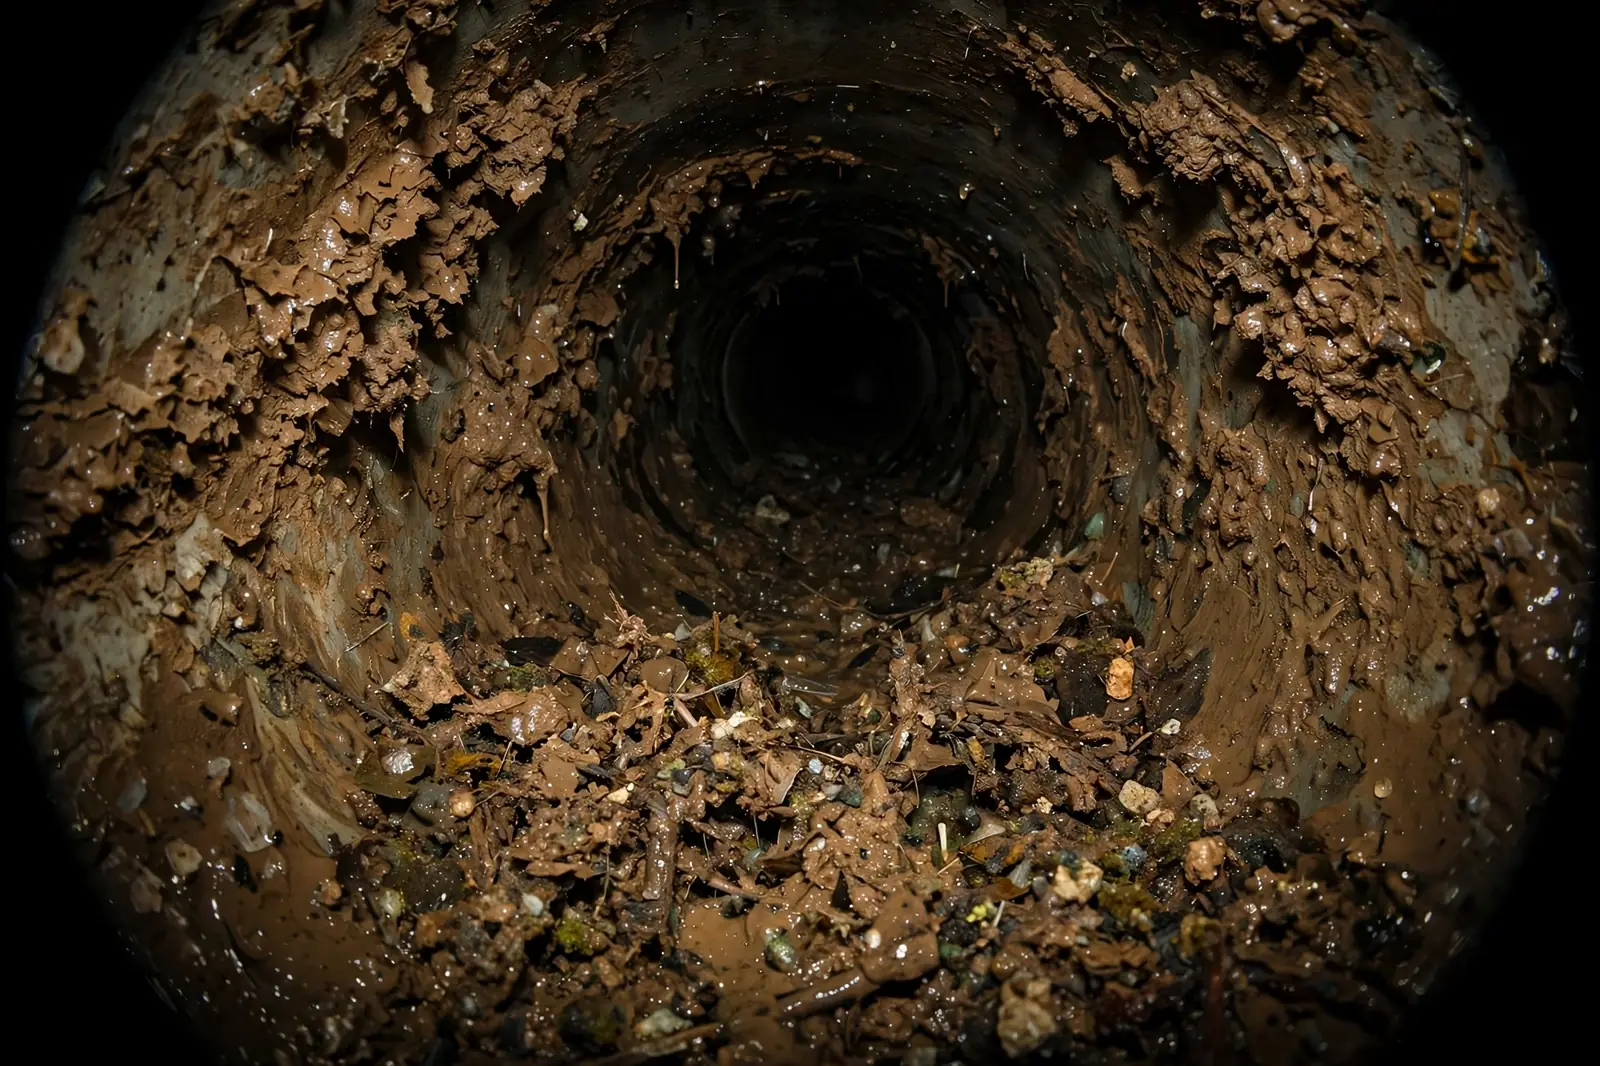
Before & After Hydro Jetting
Before and after camera photos show a drain or sewer line before jetting and after jetting. The before view shows coated walls or a blockage, and the after view shows the same pipe washed clean. Call (833) 878-1592 to book a camera inspection for your own line. The gallery holds 30 pairs, and every pair is an original image made for this site.
Updated 2026-11-18. Prices shown are estimates only.
What do before and after photos show?
Before and after photos show the inside of a drain or sewer line on camera, before jetting and after jetting. The before image usually shows a coated pipe wall, a narrow opening, or a blockage of grease, scale, or roots. The after image shows the same stretch of pipe with the walls washed clean and the full width open.
These photos are a record of one job, not a promise about yours. Every line is different. Pipe material, buildup type, and pipe condition all change what the after image can look like. A camera check on your own line is the only way to know what cleaning will do for it.
A pair is most useful when the two images are read together. The before image shows the problem as the camera saw it: grease coating the wall, scale narrowing the pipe, roots crossing the line, or debris sitting in the bottom. The after image shows the same stretch after the clean: the wall visible again, the full width of the pipe open, water moving freely. The difference between the two is the work. A pair that shows a clean pipe after jetting does not prove the whole line is clear, only that the stretch in the picture is, which is why the crew runs the camera along the line and checks the flow at the fixtures as well.
How are before and after photos taken?
The plumber runs a camera into the line before jetting and records what it sees. Then the line is jetted in passes until the flow is clear. Then the camera goes back in and records the same stretch again. The two recordings are matched by distance from the access point, so the before and after views show the same section of pipe.
Ask to see the camera footage from your own visit. A good crew will show you the before and after views on the screen and explain what changed. Ask for a short written note of the findings too, since it helps if the problem comes back or another plumber needs the history.
The camera is a small waterproof camera on a flexible cable, pushed into the line through a cleanout or an access point. It carries its own light, and the picture it sends back is shown on a monitor above ground. The operator can record a still image or a short clip, and the distance along the cable is shown on the screen, so the crew knows how far into the line each picture was taken. The before picture is taken during the first camera look, before any jetting starts. The after picture is taken during the final camera check, after the line has been cleaned and the debris flushed out.
What can before and after photos not show?
Photos cannot show whether a pipe is weak under the surface, or whether roots will grow back through a joint. They show the inside of the pipe on the day of the visit, and nothing more. A clean after image does not mean the pipe is free of cracks, and it does not mean the line will stay clear for a set time.
Photos also cannot show the full length of a line in one frame. A line may be clean near the access point and still hold buildup further down. That is why the camera should travel the full length of the line, and why the final check should cover the whole run, not just the easy first section.
A photo cannot show whether a pipe will stay clear. Roots grow back, grease builds up again, and a pipe that is cracked where the roots entered will let them back in. A photo cannot show the state of the whole line, only the stretch in front of the camera at that moment. It cannot show a leak outside the pipe, a belly in the line where water sits, or a joint that is about to fail. It cannot show the pressure used, the number of passes, or the time the job took. Those are matters for the crew's notes and for the written quote, not for a picture. A gallery is a record of what was done, not a promise of what will last.
How should you use gallery photos?
Use gallery photos to learn what buildup looks like and what jetting can remove. Compare the before image with what your own camera check shows. If your line looks like a gallery before image, jetting may help. If your camera shows a break or a collapse, a gallery photo will not change that, and a repair is the right next step.
Call (833) 878-1592 to book a camera inspection if you want to see your own line. The inspection gives you a before image of your pipes, and a jetting visit gives you the after image to match it.
Use them to learn what a blockage looks like from the inside, and to see what a clean pipe looks like after jetting. A kitchen line with grease looks different from a main line with scale, and a line with roots looks different again, and the gallery shows those differences. Use them to ask better questions when the crew shows you your own camera footage: which stretch is this, what is the coating on the wall, is that a crack or a joint? Do not use them to diagnose your own line. Your line needs its own camera look, because no two lines block in quite the same way, and a photo of someone else's pipe cannot tell you what is in yours.
What a camera sees inside a drain
A drain camera sees a world that is dark, wet, and narrow. The picture is lit by a small ring of light around the lens, and the walls of the pipe curve away on every side. In a clean pipe, the walls are smooth and the water runs clear, and the joints appear as thin lines at regular intervals. In a blocked pipe, the walls are coated: grease looks like a pale, uneven layer, scale looks like rough brown crust, and roots look like pale fibres crossing the pipe, sometimes thick enough to form a mat.
The camera also shows the pipe itself. PVC is smooth and pale, cast iron is dark and rough, clay is brown and segmented, with a joint every few feet. A crack appears as a dark line across the wall, a break as a gap with earth behind it, and a belly as a stretch where water sits and the camera seems to swim. The operator reads those signs as the cable moves, and the distance counter on the screen says how far into the line each picture was taken. That is how the crew knows not just what is wrong, but where it is.
The pairs on this page, and where they come from
Every pair on this page is an original image made for this site, showing a camera view inside a pipe before and after a jetting job. The before image shows the problem, and the after image shows the same stretch after the clean, taken from the same angle, with the same framing and the same lighting, so the comparison is honest. The pairs cover the work this site refers: kitchen lines with grease, main lines with scale, sewer lines with roots, and commercial lines with heavy buildup.
The captions describe the work in general terms — 'Main line cleared of grease buildup', for example — and they do not attach a customer name, an address, or a date to a photo. No photo on this site is presented as a picture of your line, and no photo is a stock image borrowed from elsewhere. The pairs are examples of what jetting does to a pipe, not records of a particular visit, and they are shown so you can see the method before you book, not so you can judge a visit that has not happened yet.
Grease: what the camera shows before and after
Grease is the most common thing a kitchen line camera shows. Before jetting, the wall is coated in a pale, uneven layer that narrows the pipe, sometimes to half its width. The layer is soft near the sink, where the water is still warm, and harder further down, where it has cooled and set. Food waste sticks to it, and the water runs slowly, leaving a line on the wall that shows how high it stood. In a bad case, the pipe is nearly closed, and the water in the sink drains so slowly that it is easy to think the trap is the problem, when the trouble is metres down the line.
After jetting, the wall is visible again, and the full width of the pipe is open. Hot, high-pressure water melts and strips the grease from the walls and flushes it away, and the final camera check shows a clean wall with the joints visible. The difference is not subtle: a greasy pipe and a clean pipe look nothing alike on camera. The after picture does not promise the line will stay clean — grease builds up again if oil keeps going down the sink — but it shows that the clean was done, and it shows what to aim for when the line is checked again.
Scale and roots: what the camera shows before and after
Scale looks very different from grease. It is a hard, rough crust on the inside of the pipe, usually brown or grey, built up over years by minerals in the water. In cast iron it can be thick enough to halve the width of the pipe, and it catches everything that flows past, so a scaled line blocks more often and more suddenly than a clean one. Before jetting, the camera shows a rough, uneven wall with the crust flaking at the edges. After jetting, the wall is smoother, the full width is open, and the joints are visible again, though a badly scaled pipe may need more than one pass, and some scale may remain.
Roots look different again. They enter through a joint or a small crack and grow across the pipe, forming pale fibres that catch paper and waste. Before clearing, the camera shows a mat of fibres, sometimes thick enough to block the pipe altogether. After cutting and jetting, the fibres are gone and the wall is clear, but the joint or crack they entered through is still there, and the camera will show it. That is why a root job ends with a talk about what the camera showed and when a follow-up check would be worth it, rather than with a promise that the roots are gone for good.
Commercial lines: what the camera shows
Commercial lines are larger and longer than home lines, and they carry more waste each day, so the camera shows more of everything: thicker grease in a restaurant line, more scale in a hotel line, more paper and debris in an office line. The before pictures in a commercial pair often show a pipe that is narrowed along its whole length, not just in one spot, because the line is used hard every day. The after pictures show the same stretch with the walls visible and the full width open, which matters more in a commercial building, where a backup during service costs far more than a cleaning.
The pairs for commercial work are taken the same way as the home pairs: a camera look first, then the jetting, then a final camera check from the same angle. The captions describe the work in general terms, and they do not name the business or the building. A commercial pair is a record of what jetting does to a large line, not a promise that a particular building's lines are clear, and a building with several lines needs each one checked on its own.
How to read a pair honestly
A before and after pair is honest only if the two pictures show the same stretch of pipe, from the same angle, with the same light. That is how the pairs on this site are made: the camera goes back to the same distance along the cable for the after picture, so the comparison is between the same wall before and after the clean. If the two pictures showed different stretches, the comparison would mean nothing, and a pair made that way would be misleading.
Read a pair with that test in mind. Look at the joints: they should be in the same place in both pictures. Look at the light: it should fall the same way. Look at the water: it should be moving freely in the after picture, not just absent. And remember what a pair cannot show: whether the whole line is clear, whether the pipe is damaged, or whether the line will stay clear. Those are questions for the crew and the camera on your own line, not for a picture of someone else's.
What the gallery does not promise
The gallery does not promise that your line will look like the pictures, or that a jetting visit will fix your line. Every line is different: different material, different age, different buildup, different damage. A kitchen line with light grease may clear in one pass, while a main line with heavy scale may need several, and a line with a broken section may need a repair instead of a clean. The pictures show what the method can do when the pipe is sound and the blockage is the kind jetting removes.
The gallery also does not promise a price. The pairs show the work, not the bill, and the price of a visit depends on the line, the access, and what the camera finds. The cost report gives the typical ranges as estimates, and the written quote before work starts is the firm price. Use the gallery to understand the method, to see what a clean pipe looks like, and to ask better questions when the crew shows you your own footage. That is what it is for, and it does not try to be more.
A note on image quality and what to look for
Camera images are not studio photographs. They are lit by a small ring of light, they are sometimes cloudy where the water is murky, and they can be hard to read if you have never seen one before. That is normal, and it is why the crew explains the footage on site rather than leaving you to read it alone. When you look at a pair, look for the joints first: they are the thin lines at regular intervals, and they should be in the same place in both pictures. Then look at the wall between the joints: is it coated, is it smooth, is it clear? Then look at the water: is it standing, is it moving, is it clear?
If a picture looks too perfect — too bright, too clean, too much like a drawing — it is probably not a camera view at all. The pairs on this site are camera views, with the limits that come with them: dim light, a narrow field, and water that is sometimes cloudy. Those limits are part of the honesty of the pair, and they are why the captions describe the work in general terms rather than promising a particular result for your line.
Signs you may need hydro jetting
- Water drains slowly from sinks, tubs, or showers even after the trap is cleaned.
- The same drain clogs again within weeks of being cleared with a plunger or snake.
- Several fixtures drain slowly at the same time, which points to a problem further down the line.
- You hear gurgling from a sink or toilet when another fixture is used.
- Bad smells rise from drains, especially after running water in the kitchen or bathroom.
- Water backs up into a tub, shower, or floor drain when a toilet is flushed or a washer runs.
- A before picture that shows grease, scale, or roots coating the pipe wall, narrowing the line.
- An after picture of the same stretch, from the same angle, with the wall visible and the full width open.
- Joints in the same place in both pictures, which is how you know the pair shows the same stretch.
How it works
- 1
Step 1 — Camera inspection
The plumber sends a small camera into the line first. It shows the blockage type, the pipe material, and any weak spots, so the pressure and nozzle can be matched to the pipe.
- 2
Step 2 — High-pressure cleaning
A hose with a jetting nozzle goes into the line through a cleanout. Water jets spray forward and back, cutting buildup from the pipe walls and flushing debris out through the sewer.
- 3
Step 3 — Final check and cleanup
The camera goes back in to confirm the line is clear. The crew checks flow at the fixtures, cleans the work area, and explains what was found and what to watch for next.
What does it cost?
Typical ranges only. These are estimates, not quotes. The final price depends on line length, access, and what the camera inspection finds.
| Service | Typical range (estimate) | Notes |
|---|---|---|
| Main line hydro jetting | $350 – $650 | Most homes |
| Camera inspection with jetting | $150 – $350 | Often included |
| Single drain line jetting | $250 – $550 | One branch line |
| Repeat or heavy buildup cleaning | $400 – $900 | Extra passes needed |
Prices are estimates only. The local company that does the work sets its own final pricing.